Prompts allow you to specify parameters that guide users
when requesting reports. How the user responds to the prompts determines
the data that is included in the output. You may define as many prompts
as needed to filter the source data and isolate the loans that you wish
to analyze. These prompts are used for two purposes; the first is to standardize
reports for ease of use, the second is to provide guidance in selecting
data elements when requesting reports.
· What type of predefined prompts
are available?
· How
do I add a predefined prompt to a report filter?
· How
can I create a simple prompt for a report filter?
There are four types of prompts that you may define
as follows:
· Attribute
element list prompt - this type of prompt allows you to select values
associated with an attribute to be used for filtering data to generate
output.
When defining this prompt, you specify the attribute
to be used and the list of values available for selection. The list of
values may include all values associated with the attribute or a filtered
list of values.
Show me
how to define an Attribute Element Prompt.
· Attribute qualification
prompt - this type of prompt allows you to select the attribute(s)
from a list and then the values associated with each attribute to be used
for filtering data to generate output.
When defining this prompt, you specify one or
more attributes available for selection. You cannot limit the list of
values for each attribute, the full list of values is made available for
selection when running a report with this type of prompt.
Show me
how to define an Attribute Qualification Prompt.
· Metric qualification
prompt - this type of prompt allows you to select the metrics(s) from
a list and then the values associated with each attribute to be used for
filtering data to generate output.
When defining this prompt, you specify one or
more metrics available for selection from the prompt. When running a report
that uses this type of prompt, you specify the comparison value to filter
the data to generate output.
Show me
how to define a Metric Qualification Prompt.
· Attribute
Hierarchy qualification prompt - this type of prompt allows you select
the level of the attribute hierarchy and the values to be included.
When defining this prompt, you specify one or
more hierarchies defined for the application. When running a report that
uses this type of prompt, you specify the hierarchy elements to use, the
comparison operator for each hierarchy element and the values to filter
the data and generate the output.
Show
me how to define a Hierarchy Qualification Prompt.
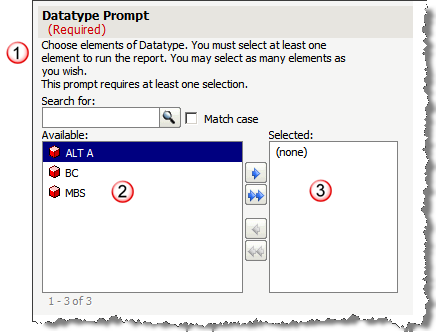
When requesting a report, an attribute element prompt
will display a list of values for a single attribute and allow you to
select the values you wish to include in the output. This type of prompt
will present you with a list of Available values and you move the desired
values to a Selected list prior to running the report. Show
me how to define an Attribute Element Prompt.
The following is an example of an Attribute Element
prompt:

|
When
the prompt is defined, you may specify if a selection is required
as well as the minimum and maximum number of elements that may
be selected. This information is presented as part of the description
content on the prompt page.
The prompt setup also allows you to
add a free format description that will be displayed on the report
prompt page.
Additionally, if the list of values
is large (e.g., more than can be displayed in one "page"
of the Available list) you may enable search processing to allow
the requestor to filter the list of values for selection.

|
|

|
Available
This prompt has been defined to use
the "shopping cart" type of prompt. The shopping cart
view provides a list of elements (values) for the attribute (e.g.,
Data Type in the example) in an Available box. The list is automatically
populated with the values associated with the attribute.
When you define the prompt, you may
specify a custom list of Available values (e.g., limit the list
of values that appear in the prompt). |

|
Selected
The shopping cart type prompt allows
you to move elements from the Available list to the Selected list
using the arrow buttons (i.e., you select an element from the
list and click the arrow to move only the selected values or all
values).
Any element that appears in the Selected
box will be included in the output. Those elements left in the
Available box will be omitted. |
Defining an Attribute Element Prompt Back to Previous
Now that you have seen an example, the following steps
guide you through defining an Attribute Element prompt:

|
Select
the option to Create Prompt and then select the Attribute Element
prompt option.
You may select the option from the hyperlinks
at the top of each page or from the icon toolbar ribbon from Shared
or My Reports

|


|

|
Select
the Attribute Element prompt option.
The Attribute Element Setup window is
presented. |

|

|
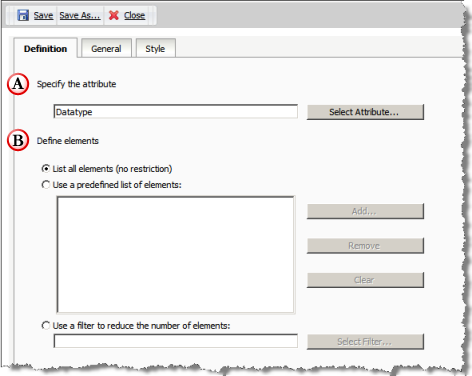
Definition
Tab
This tab allows you to define the attribute
associated with the prompt and the source of the list of values.
 Select the attribute associated with the prompt. There is a Select
button that will present a dialog with a list of attributes. Once
you select the attribute, the entry field is populated.
 Once you define the attribute, you must specify the list of elements
within that attribute that may be selected. There are three options
as follows:
List of all elements - this will simply
list all values for the selected attribute (the most common setup).
Use a predefined list - this will allow
you to select from a list of values for the specified attribute.
You must click Add to add the elements. The Remove and Clear allow
you to remove items from the list once they are added.
Use a filter to reduce the number of
elements - this will allow you to build the list of available
elements based on a predefined filter. |
|

|
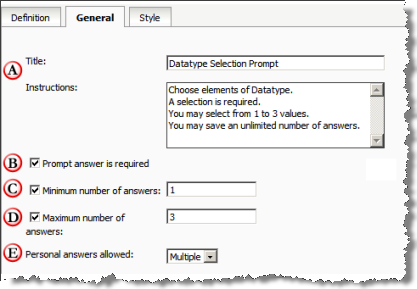
General
Tab
This tab allows you to specify the instructions
displayed and the prompt selection requirements.
 Title and Description are displayed when the prompt is used to
run a report.
 When the box for prompt answer required is checked, the prompt
must have at least one condition defined to run the report. The
Min and Max number of answers controls the actual number allowed.

 The Minimum and Maximum number of answers
allows you to limit the number of conditions that may be added
for this prompt (e.g., the min and max count of conditions). The Minimum and Maximum number of answers
allows you to limit the number of conditions that may be added
for this prompt (e.g., the min and max count of conditions).
 Personal Answers Allowed is used when you select the option to
save the current answers for the prompt when running a report.
You can save the selections on the prompt when running a report.
This defines if (1) you can save your answers and (2) how many
sets of answers you can save (i.e., one or multiple).
If you allow the user to save a single
answer, a checkbox prompt is presented to specify if you wish
to save the answer.
If you allow the user to save multiple
answers, a checkbox prompt is presented to specify if you wish
to save the answer and a Name field to name this answer and differentiate
it from other saved answers for the prompt and report combination. |
|

|
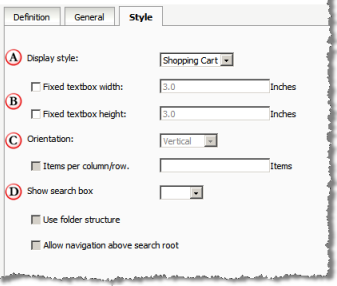
Style
Tab
This tab allows you to specify the settings
for the presentation of the prompt when used on a report.
 The Display Style defines the type of layout and provides a selection
list of five layouts:
Shopping Cart - the most common for
selection prompts, provides an Available list of values and a
Selected list to display those values you have selected
for the prompt answer.
Radio Button - the values are listed
with a radio button next to each value. If the radio button is
selected, the value is selected.
Checkbox - the values are listed with
a checkbox next to each value. If checked, the value is selected.
Pull Down - the values are listed in
a drop down list box. You open the drop down list box and highlight
the values you wish to select.
List - the values are displayed in a
list box. You highlight the values you wish to select.
 The Fixed Textbox Width and Height allow you to specify the size
of the selection controls. This is applied to all Style types.
 The Orientation options define how the prompt options are arranged
and the items per column/row (depending on alignment) specify
the maximum number of prompt options are displayed per row/column.
These settings are only applied for the Styles of Radio Button
and Checkbox.
 The Show Search box allows you to include a search option to the
prompt values to limit the list based on the search. Once enabled,
you may also specify if the search results show a folder structure
and how high up the folder structure you can search.
|
|
An attribute qualification prompt allows you to provide
a list of one or more attributes for filter selection when requesting
a report. When this type of prompt is added to a report, you are presented
with the list of attribute(s) in an Available selection box; you move
an attribute to the Selected box and specify the conditions for the filter.
The number of attributes you may use is defined when you configure the
prompt. The output is then generated based on those conditions. Show me how to define an Attribute Qualification
Prompt.
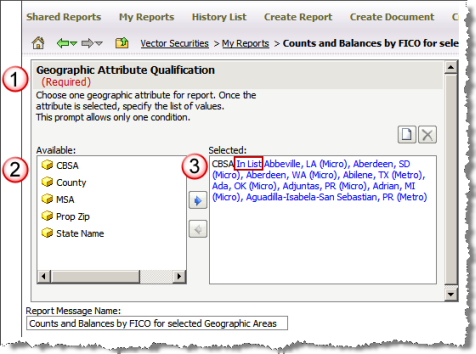
The following is an example of an attribute qualification
prompt with each of the geographic attributes:

|
When
the prompt is defined, you may specify if a selection is required
as well as the minimum and maximum number of elements that may
be selected. This information is presented as part of the description
content on the prompt page.
The prompt setup also allows you to
add a free format description that will be displayed on the report
prompt page.

|
|

|
Available
This prompt has been defined to use
the "shopping cart" presentation. The shopping cart
view provides a list of attributes in an Available list box. The
list is populated with the attributes you specified in the setup. |

|
Selected
The shopping cart type prompt allows
you to move elements from the Available list to the Selected list
using the arrow buttons (i.e., you select an element from the
list and click the arrow to move only the selected values or all
values).
Once you move an attribute to the Selected
box, you must specify the list of values to be included/excluded
from the output.
If multiple selections are allowed,
you must also specify the join operator between these conditions.
This is not demonstrated in the sample screen shot. |
Defining an Attribute Qualification Prompt Back to Previous
Now that you have seen an example, the following steps
guide you through defining an Attribute Qualification prompt:

|
Select
the option to Create Prompt and then select the Attribute Qualification
prompt option.
You may select the option from the hyperlinks
at the top of each page or from the icon toolbar ribbon from Shared
or My Reports

|


|

|
Select
the Attribute Qualification prompt option.
The Attribute Qualification Setup window
is presented. |

|

|
Definition
Tab
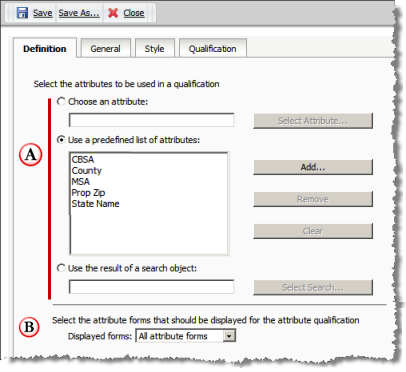
This tab allows you to define the attributes
associated with the prompt.
 Select the option to populate the list of attributes for the qualify
prompt.
You may specify one attribute, a list
of attributes or build the list as a result of a search. When
you click the button for the option you wish to use, the corresponding
command buttons become enabled and allow you to search for attributes
and, or the second option, allows you to remove a selected item
or clear the entire selection list.
The first two options will display a
popup window to search for and select either a single attribute
(for first option) or multiple attributes (for second option).
The Search option allows you to specify
a search object that will populate the list of attributes for
selection. This option provides limited functionality as you cannot
create a search object.
 Once you define the attribute, you must specify attribute forms
available for selection when defining the condition.
Attribute forms represent the different
type of values for the attribute. In general terms, each attribute
has an ID which represents the numeric value for the attribute
value (e.g., for CBSA, it would be the CBSA code) and at least
one DESC which represents the text value (e.g., the name of the
CBSA area). It is recommended you leave this at the default of
All Attribute Forms. |
|

|
General
Tab
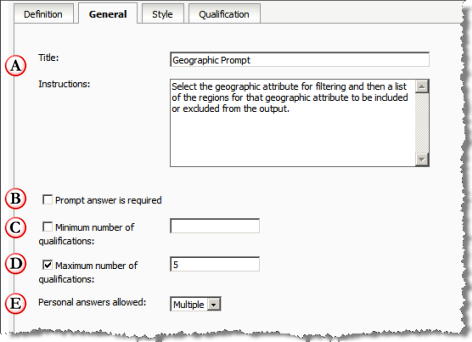
This tab allows you to specify the instructions
displayed and the prompt selection requirements.
 Title and Description are displayed when the prompt is used to
run a report.
 When the box for prompt answer required is checked, the prompt
must have at least one condition defined to run the report. The
Min and Max number of answers controls the actual number allowed.

 The Minimum and Maximum number of answers
allows you to limit the number of conditions that may be added
for this prompt (e.g., the min and max count of conditions). The Minimum and Maximum number of answers
allows you to limit the number of conditions that may be added
for this prompt (e.g., the min and max count of conditions).
 Personal Answers Allowed is used when you select the option to
save the current answers for the prompt when running a report.
You can save the selections on the prompt when running a report.
This defines if (1) you can save your answers and (2) how many
sets of answers you can save (i.e., one or multiple).
If you allow the user to save a single
answer, a checkbox prompt is presented to specify if you wish
to save the answer.
If you allow the user to save multiple
answers, a checkbox prompt is presented to specify if you wish
to save the answer and a Name field to name this answer and differentiate
it from other saved answers for the prompt and report combination. |
|

|
Style
Tab
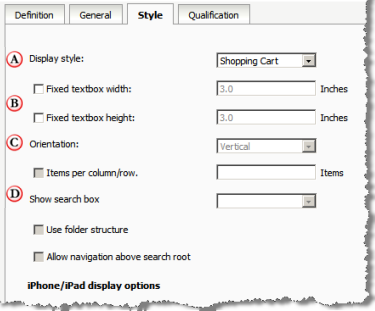
This tab allows you to specify the settings
for the presentation of the prompt when used on a report.
 The Display Style defines the type of layout and provides a selection
list of five layouts:
Shopping Cart - the most common for
selection prompts, provides an Available list of values and a
Selected list to display those values you have selected
for the prompt answer.
Radio Button - the values are listed
with a radio button next to each value. If the radio button is
selected, the value is selected.
Checkbox - the values are listed with
a checkbox next to each value. If checked, the value is selected.
Pull Down - the values are listed in
a drop down list box. You open the drop down list box and highlight
the values you wish to select.
List - the values are displayed in a
list box. You highlight the values you wish to select.
 The Fixed Textbox Width and Height allow you to specify the size
of the selection controls. This is applied to all Style types.
 The Orientation options define how the prompt options are arranged
and the items per column/row (depending on alignment) specify
the maximum number of prompt options are displayed per row/column.
These settings are only applied for the Styles of Radio Button
and Checkbox.
 The Show Search box allows you to include a search option to the
prompt values to limit the list based on the search. Once enabled,
you may also specify if the search results show a folder structure
and how high up the folder structure you can search.
|
|

|
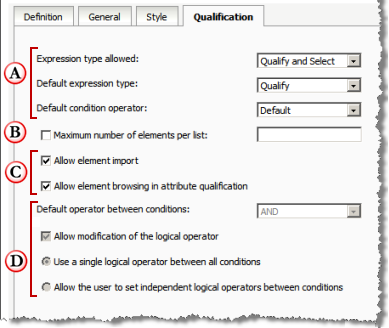
Qualification
Tab
This tab allows you to specify the type
of comparison operators available for individual conditions and
the join operator handling when multiple conditions are joined
together within the prompt answers.
 The "expressions" represent the comparison operators
allowed for a condition. You may specify Qualify expression operators
(e.g., "Equal To", "Greater Than", etc), or
Select expression operators (e.g., "In List" or "Not
In List") or allow both. You may also specify the default
expression and the default operator within the expression choice.
 The maximum number of elements per list allow you to limit the
number of value selections within one condition when you have
specified a Select expression (e.g., you will only allow 5 CBSA
codes to be selected for each condition).
 Allow element import and browse options determine if you wish
to enable aids for selecting values.
The Import option allows you to import
values to populate the list in a condition (e.g., import a list
of zip codes for a prompt on Zip Code if available in the application).
The Browse option allows you to enable
a Browse hyperlink within the prompt selection that displays all
values available for selection from the source data (e.g., a list
of CBSA codes that are supported in the application).
 These fields control the application of join operators when defining
multiple conditions in the prompt answer (e.g., AND, OR,
AND NOT, OR NOT).
The additional fields indicate if modification
of the default join operator is allowed and if the there is one
join operator for all conditions or individual join operators
between each condition. |
|
A metric qualification prompt allows you to provide
a list of one or more metrics for filter selection when requesting a report.
When this type of prompt is added to a report, you are presented with
the list of metric(s) in an Available selection box; you move a metric
to the Selected box and specify the conditions for the filter. The number
of metrics you may use is defined when you configure the prompt. The output
is then generated based on those conditions. Show
me how to define a Metric Qualification Prompt.
The following is an example of an metric qualification
prompt with selected loan count and balance metrics:

|
When
the prompt is defined, you may specify if a selection is required
as well as the minimum and maximum number of elements that may
be selected. This information is presented as part of the description
content on the prompt page.
The prompt setup also allows you to
add a free format description that will be displayed on the report
prompt page.

|

|

|
Available
This prompt has been defined to use
the "shopping cart" presentation. The shopping cart
view provides a list of metrics in an Available list box. The
list is populated with the metrics you specified in the setup. |

|
Selected
The shopping cart type prompt allows
you to move elements from the Available list to the Selected list
using the arrow buttons (i.e., you select an element from the
list and click the arrow to move only the selected values or all
values).
Once you move a metric to the Selected
box, you must specify value and comparison operator for the condition.
If multiple selections are allowed,
you must also specify the join operator between these conditions.
This is not demonstrated in the sample screen shot. |
Defining a Metric Qualification Prompt Back to Previous
Now that you have seen an example, the following steps
guide you through defining a Metric Qualification prompt:

|
Select
the option to Create Prompt and then select the Metric Qualification
prompt option.
You may select the option from the hyperlinks
at the top of each page or from the icon toolbar ribbon from Shared
or My Reports

|


|

|
Select
the Metric Qualification prompt option.
The Metric Qualification Setup window
is presented. |

|

|
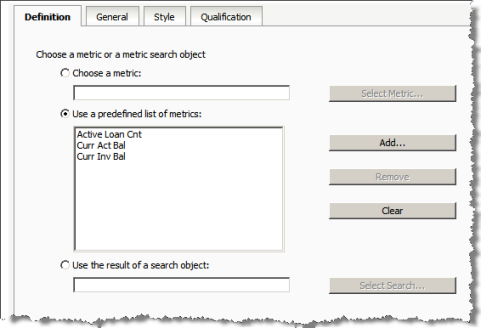
Definition
Tab
This tab allows you to define the attributes
associated with the prompt.
Select the option to populate the list
of metrics for the qualify prompt.
You may specify one metric, a list of
metrics or build the list as a result of a search.
When you click the button for the option
you wish to use, the corresponding command buttons become enabled
and allow you to search for metrics and, or the second option,
allows you to remove a selected item or clear the entire selection
list.
The first two options will display a
popup window to search for and select either a single metric (for
first option) or multiple metrics (for second option).
The Search option allows you to specify
a search object that will populate the list of metrics for selection.
This option provides limited functionality as you cannot create
a search object.
|
|

|
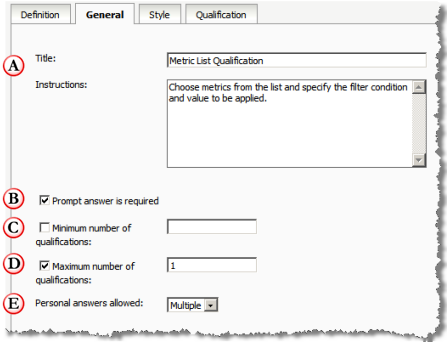
General
Tab
This tab allows you to specify the instructions
displayed and the prompt selection requirements.
 Title and Description are displayed when the prompt is used to
run a report.
 When the box for prompt answer required is checked, the prompt
must have at least one condition defined to run the report. The
Min and Max number of answers controls the actual number allowed.

 The Minimum and Maximum number of answers
allows you to limit the number of conditions that may be added
for this prompt (e.g., the min and max count of conditions). The Minimum and Maximum number of answers
allows you to limit the number of conditions that may be added
for this prompt (e.g., the min and max count of conditions).
 Personal Answers Allowed is used when you select the option to
save the current answers for the prompt when running a report.
You can save the selections on the prompt when running a report.
This defines if (1) you can save your answers and (2) how many
sets of answers you can save (i.e., one or multiple).
If you allow the user to save a single
answer, a checkbox prompt is presented to specify if you wish
to save the answer.
If you allow the user to save multiple
answers, a checkbox prompt is presented to specify if you wish
to save the answer and a Name field to name this answer and differentiate
it from other saved answers for the prompt and report combination. |
|

|
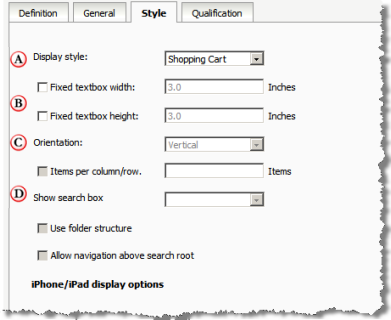
Style
Tab
This tab allows you to specify the settings
for the presentation of the prompt when used on a report.
 The Display Style defines the type of layout and provides a selection
list of five layouts:
Shopping Cart - the most common for
selection prompts, provides an Available list of values and a
Selected list to display those values you have selected
for the prompt answer.
Radio Button - the values are listed
with a radio button next to each value. If the radio button is
selected, the value is selected.
Checkbox - the values are listed with
a checkbox next to each value. If checked, the value is selected.
Pull Down - the values are listed in
a drop down list box. You open the drop down list box and highlight
the values you wish to select.
List - the values are displayed in a
list box. You highlight the values you wish to select.
 The Fixed Textbox Width and Height allow you to specify the size
of the selection controls. This is applied to all Style types.
 The Orientation options define how the prompt options are arranged
and the items per column/row (depending on alignment) specify
the maximum number of prompt options are displayed per row/column.
These settings are only applied for the Styles of Radio Button
and Checkbox.
 The Show Search box allows you to include a search option to the
prompt values to limit the list based on the search. Once enabled,
you may also specify if the search results show a folder structure
and how high up the folder structure you can search.
|
|

|
Qualification
Tab
This tab allows you to specify the type
of comparison operators available for individual conditions and
the join operator handling when multiple conditions are joined
together within the prompt answers.
 You may specify the default operator within the condition (e.g.,
Equals, Greater than or equal to, etc) and the default operator
between conditions (e.g., AND, OR, AND NOT, OR NOT).
 These fields control the application of join operators when
defining multiple conditions in the prompt answer (e.g.,
AND, OR, AND NOT, OR NOT).
The additional fields indicate if modification
of the default join operator is allowed and if the there is one
join operator for all conditions or individual join operators
between each condition.
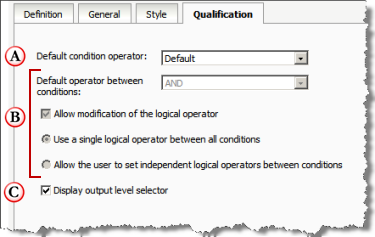
 The checkbox to Display Output Level Indicator enables the ability
to specify the level at which the metric value is determined.
This will enable a Level value for the
metric qualification prompt when requesting a report. The default
level is "Metric" which uses the lowest level of granularity
based on the attribute dimension cutoff values. |
|
A hierarchy qualification prompt allows you to provide
a predefined attribute hierarchy within a prompt to specify the attributes
to be included when filtering output. When this type of prompt is added
to a report, you are presented with the list of attribute(s) within the
hierarchy in an Available selection box; you move an attribute to the
Selected box and specify the conditions for the filter. The number of
hierarchy attributes you may use is defined when you configure the prompt.
The output is then generated based on those conditions. Show
me how to define a Hierarchy Qualification Prompt.
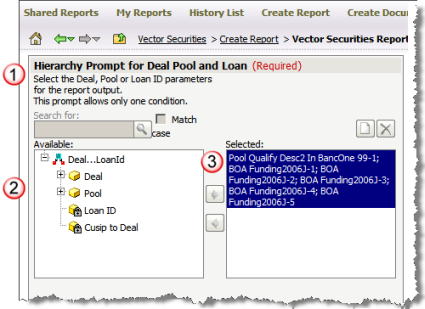
The following is an example of a hierarchy qualification
prompt with the Deal hierarchy of deal, pool and loan:

|
When
the prompt is defined, you may specify if a selection is required
as well as the minimum and maximum number of elements that may
be selected. This information is presented as part of the description
content on the prompt page.
The prompt setup also allows you to
add a free format description that will be displayed on the report
prompt page.

|
|

|
Available
This prompt has been defined to use
the "shopping cart" presentation. The shopping cart
view provides a list of hierarchies in an Available list box.
The list is populated with the hierarchies you specified in the
setup. |

|
Selected
The shopping cart type prompt allows
you to move elements from the Available list to the Selected list
using the arrow buttons (i.e., you select an element from the
list and click the arrow to move only the selected values or all
values).
Once you move a hierarchy attribute
to the Selected box, you must specify value(s) and comparison
operator for the condition.
If multiple selections are allowed,
you must also specify the join operator between these conditions.
This is not demonstrated in the sample screen shot. |
Defining a Hierarchy Qualification Prompt Back to Previous
Now that you have seen an example, the following steps
guide you through defining a Hierarchy Qualification prompt:

|
Select
the option to Create Prompt and then select the Metric Qualification
prompt option.
You may select the option from the hyperlinks
at the top of each page or from the icon toolbar ribbon from Shared
or My Reports

|


|

|
Select
the Hierarchy Qualification prompt option.
The Hierarchy Qualification Setup window
is presented. |

|

|
Definition
Tab
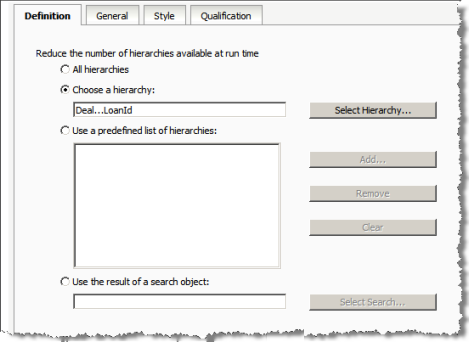
This tab allows you to define the hierarchy
associated with the prompt.
Select the option you wish to use to
populate the list of hierarchies for the qualify prompt.
You may specify all hierarchies, one
hierarchy, a list of hierarchies or build the list as a result
of a search.
When you click the button for the option
you wish to use, the corresponding command buttons become enabled
and allow you to search for metrics and, or the second option,
allows you to remove a selected item or clear the entire selection
list.
The second and third options will display
a popup window to search for and select either a single metric
(for first option) or multiple metrics (for second option).
The Search option allows you to specify
a search object that will populate the list of metrics for selection.
This option provides limited functionality as you cannot create
a search object. |
|

|
General
Tab
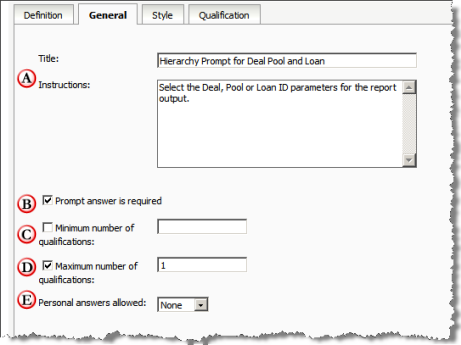
This tab allows you to specify the instructions
displayed and the prompt selection requirements.
 Title and Description are displayed when the prompt is used to
run a report.
 When the box for prompt answer required is checked, the prompt
must have at least one condition defined to run the report. The
Min and Max number of answers controls the actual number allowed.

 The Minimum and Maximum number of answers
allows you to limit the number of conditions that may be added
for this prompt (e.g., the min and max count of conditions). The Minimum and Maximum number of answers
allows you to limit the number of conditions that may be added
for this prompt (e.g., the min and max count of conditions).
 Personal Answers Allowed is used when you select the option to
save the current answers for the prompt when running a report.
You can save the selections on the prompt when running a report.
This defines if (1) you can save your answers and (2) how many
sets of answers you can save (i.e., one or multiple).
If you allow the user to save a single
answer, a checkbox prompt is presented to specify if you wish
to save the answer.
If you allow the user to save multiple
answers, a checkbox prompt is presented to specify if you wish
to save the answer and a Name field to name this answer and differentiate
it from other saved answers for the prompt and report combination. |
|

|
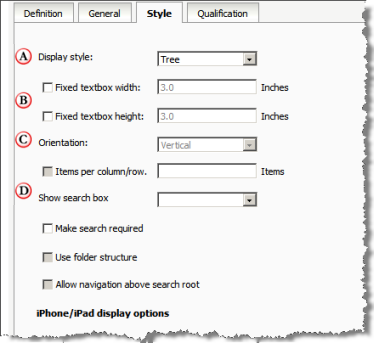
Style
Tab
This tab allows you to specify the settings
for the presentation of the prompt when used on a report.
 The Display Style defines the type of layout and provides a selection
list of five layouts:
Tree - provides a tree view with each
element of the hierarchy in the Available list of values displayed
in order of hierarchy and a Selected list to display those
values you have selected for the prompt answer.
Radio Button - the values are listed
with a radio button next to each value. If the radio button is
selected, the value is selected.
Checkbox - the values are listed with
a checkbox next to each value. If checked, the value is selected.
Pull Down - the values are listed in
a drop down list box. You open the drop down list box and highlight
the values you wish to select.
List - the values are displayed in a
list box. You highlight the values you wish to select.
 The Fixed Textbox Width and Height allow you to specify the size
of the selection controls. This is applied to all Style types.
 The Orientation options define how the prompt options are arranged
and the items per column/row (depending on alignment) specify
the maximum number of prompt options are displayed per row/column.
These settings are only applied for the Styles of Radio Button
and Checkbox.
 The Show Search box allows you to include a search option to the
prompt values to limit the list based on the search. Once enabled,
you may also specify if the search results show a folder structure
and how high up the folder structure you can search.
|
|

|
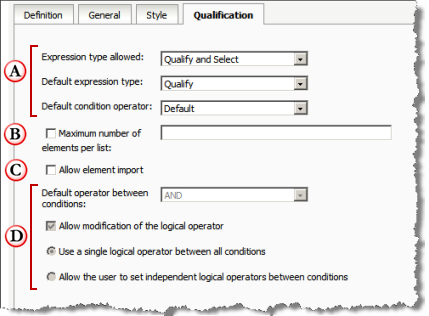
Qualification
Tab
This tab allows you to specify the type
of comparison operators available for individual conditions and
the join operator handling when multiple conditions are joined
together within the prompt answers.
 The "expressions" represent the comparison operators
allowed for a condition. You may specify Qualify expression operators
(e.g., "Equal To", "Greater Than", etc), or
Select expression operators (e.g., "In List" or "Not
In List") or allow both. You may also specify the default
expression and the default operator within the expression choice.
 The maximum number of elements per list allow you to limit the
number of value selections within one condition when you have
specified a Select expression (e.g., you will only allow 5 deals
to be selected for each deal condition).
 Allow element import and browse options determine if you wish
to enable aids for selecting values.
The Import option allows you to import
values to populate the list in a condition (e.g., import a list
of zip codes for a prompt on Zip Code if available in the application).
 These fields control the application of join operators when defining
multiple conditions in the prompt answer (e.g., AND, OR,
AND NOT, OR NOT).
The additional fields indicate if modification
of the default join operator is allowed and if the there is one
join operator for all conditions or individual join operators
between each condition. |
|
Adding a Predefined Prompt to a Report Filter Back to Previous
Once you have defined your prompts based on the type
of prompt you wish to use, you must then add it to a report. Since a prompt
is a set of conditions used to filter data, prompts are added to a report
as a Report Filter when the report is defined or from the Design Mode
when viewing a report. To do this:

|
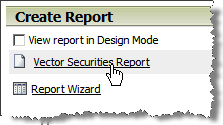
Access
the Create Report option or access the Design Model for an existing
report.

|

|

|
Add
the Prompt to your report
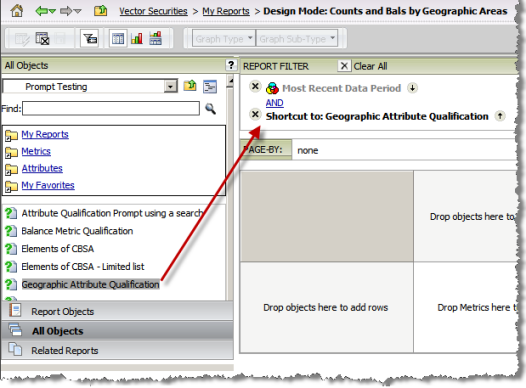
Using the browse options from the All
Objects selection in the Report Editor, search for and select
the prompt you wish to add to the report.
When added, it will appear in the Report
Filter panel as a shortcut.
Note: Since this prompt is predefined
and only linked to the report setup with a shortcut, any modifications
to the prompt will be reflected in the linked reports. |
|

|
Save
the report setup with the prompt added.
When you click the Save or Save As option,
any prompts that you have defined for the report will be presented
for you to complete. This is necessary to be able to save the
report.
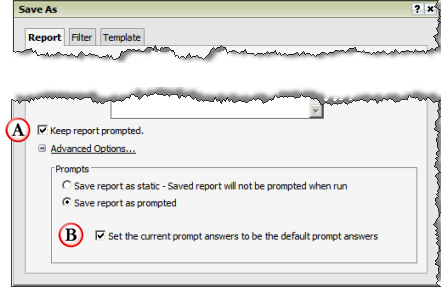
Once you complete the prompt, the Save
dialog window is presented and you can set options to handle the
prompt and the settings you have selected.
 If
you wish to present the prompt each time the report is requested,
check the Keep Report Prompted box. This is recommended, if this
box is not checked the prompt(s) will not be included in the report
and the current prompt answers will be used each time the report
is requested. If
you wish to present the prompt each time the report is requested,
check the Keep Report Prompted box. This is recommended, if this
box is not checked the prompt(s) will not be included in the report
and the current prompt answers will be used each time the report
is requested.
 If you wish to use the current prompt responses as the default
for the report, check the Set the Current Prompt Answers to be
the Default box in the Advanced Options.
If you check this box, the answers will
be saved and used each time the report is requested, but the prompt
answers may be changed when the report is requested.
|
|
|
![]()
![]()

![]()
![]()


